An event lighting plan step by step
From the site visit to a plan you can hand over: zones, lighting layers, colour, timing, power and cabling - and where furniture replaces a whole rig of lamps.
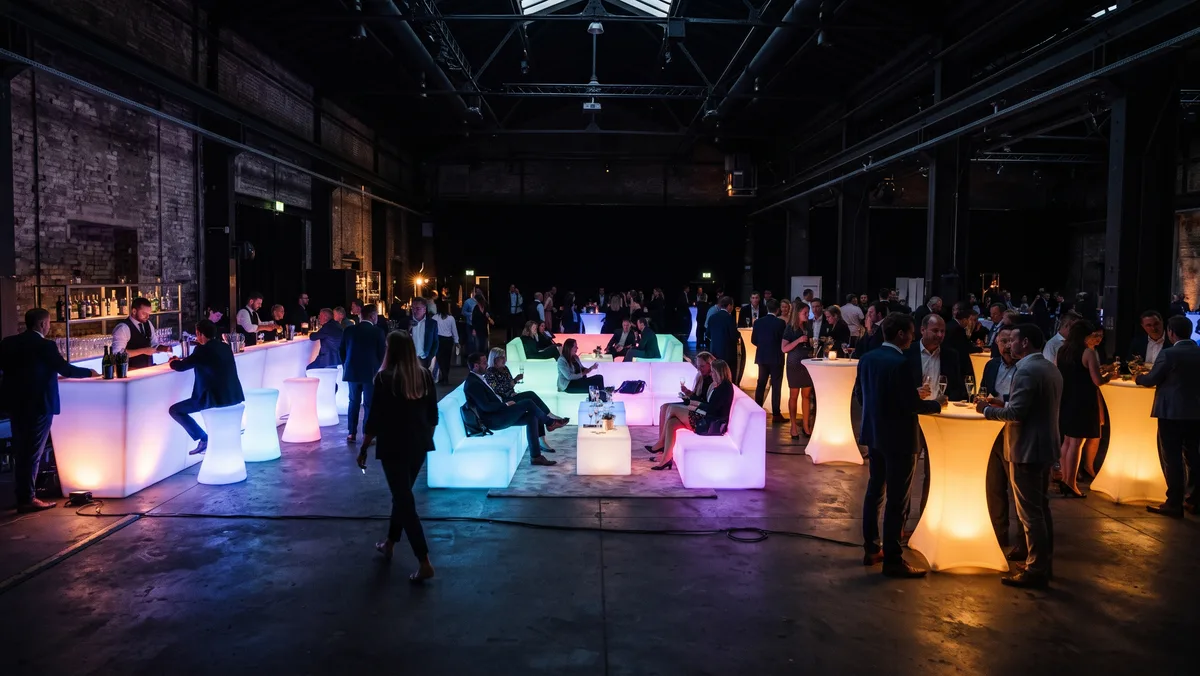
At most events the lighting plan goes wrong at the point where it begins: somebody picks a few lamps, then looks for a place and a socket for them. A usable lighting plan is built the other way round. First you decide where people will stand and what they will be doing, which gives you the zones; from the zones come the lighting layers; from the layers the equipment; and only at the very end the power and the cable. That order matters because every step narrows the next one, and it does not work backwards: a light source planned in the wrong place cannot be rescued afterwards with a cable. The process below applies equally to a large event and to a corporate dinner for forty; only the scale differs. The end result is a sheet that the technician, the master of ceremonies and the photographer can all read.
1. Site visit: what to measure, what to photograph
Go to the site visit at the time of day the event will take place - a room seen in the morning tells you nothing about what it is like in the evening. Measure the overall dimensions of the room or the area, the ceiling height and the position of the doors and windows. Note where the natural light comes from and when it disappears. Photograph every wall and corner, because in two weeks you will not remember where the steps were. List the existing lighting separately: how much of it there is, what colour it is, whether it can be switched in sections, whether there is a dimmer, and who operates it. Outdoors, look at the ground too: lawn, gravel, paving or a slope - that determines what can be set up stably. Finally, walk the load-in route from the car park to the site, because a narrow gate, steps and a gravel approach scupper more events than the technology does. With hired furniture the bottleneck is not the weight but the size: the lightest coffee table is 3.5 kg and the largest sofa 35 kg, but it is the width of the widest element that has to fit through the gate. If in doubt, measure the narrowest point and write it on your site-visit notes.
2. Marking out the zones: arrival, bar, lounge, dance floor, photo wall
A zone is not a piece of the room but a behaviour. In the arrival zone the guest gets their bearings and leaves their coat, and here the light has to give direction: let the brightness increase from the entrance towards the reception area, because people instinctively set off towards the lighter space. At the bar, the counter should be the brightest point relative to its surroundings, because the counter is the event's reference point. The lounge is the dimmest zone, and there the light should work low down, at table and seat height, not from above. The dance floor is the only place where light may move and change, but it needs a calm band at its edge where people can stop. And the photo wall or backdrop is a separate case: what is needed there is not mood but even light that draws faces. Draw these five zones onto a floor plan before choosing any equipment. A usable rule of thumb for sizing is that 3-4 guests stand comfortably around a standing table of around 110 cm, a lounge suite seats 3-5 people, and typically a third of the guests are seated at any one time. Draw in the routes between the zones as well: if the way from the bar to the dance floor runs through the lounge, the lounge will not work, because people will be walking through it constantly.
3. The three lighting layers: general, mood, accent
Every working lighting plan consists of three layers, and most mistakes come from one of the layers being missing. General light is the base level: it is what lets you see the space, the steps, the counter, the escape route - the layer of safety and orientation. Mood light gives the space its character: it is the one that sits low, is warm, and does not come from the ceiling. And accent light says what is important: the counter, the cake, the stage, the photo wall. If you have only general light, the space looks like an office. If you have only mood light, nobody can find the toilets and the photographs are unusable. If you have only accent light, the space falls apart into unconnected spots of light. The practical proportion is that in the evening you take the general layer down to the minimum, bring the mood up, and leave the accent on exactly what you want people to look at.
4. Choosing colour and brand colour: when it works, when it is a trap
Coloured light is two completely different things depending on whether it falls on people. Thrown onto a surface, a wall or furniture it works excellently, and at a corporate event it is obvious to let the brand colour set the tone of the space. Falling on people, though, saturated colour is merciless: under red or green light skin tones are hopelessly discoloured, and neither the photographer nor the videographer can restore that afterwards. The practical rule is therefore that light falling on faces should stay neutral, and the colour should be carried by the background, the furniture and the surfaces. If a brand colour is the aim, it is enough for one or two dominant elements of the space to carry it - painting a whole room one colour is rarely attractive and looks cheap in photographs. On our illuminated furniture you can choose from seven colours by remote control, so it is worth trying out the shade closest to the brand colour in advance rather than deciding on site.
5. Timing: daylight, blue hour, evening
A lighting plan is a plan in time as well as in space, not only in space. During the day natural light dominates and every artificial fitting is ineffective - do not even count on them then. After sunset comes blue hour, twenty to forty minutes depending on the season, when artificial light and the sky are equals: this is the best period for the wide shot, the group photograph and the venue pictures, so the programme should be timed around it rather than the other way round. After that comes the real evening, when only what you bring into the space is visible. Write specific times on the plan: when everything switches on, when the space changes from the dinner picture to the party picture, and who touches the switch. That last one is the line most often left out - if nobody is named to make the change and to say when, nobody will do it. With battery-powered equipment the timing has a second layer too: the charging has to be planned for the day before the event, not for its final hours, and the clock starts ticking at the moment of switching on. If you switch on in the afternoon while it is still light, you are taking that away from the evening hours - switch on at dusk, not earlier.
6. Power and cabling: the most expensive line of the lighting plan
This is where it becomes clear what the plan really costs. Go through how many devices need mains power, how much they consume, and how many separate circuits they are spread across - an overloaded circuit trips in the middle of the party, and it takes out not just the lamp but the sound system too. Outdoors or at a venue with no power supply comes the generator, which is noisy, needs fuel, and usually stands further away than you would like. Then comes the cabling: every metre of cable running through a guest area needs a cable ramp or taping down, and even then a trip hazard remains. The sensible planning principle is to reduce the number of points that need power first, and only then plan the cable to them. Every device that runs off a battery is one cable fewer on the floor - and the floor is the surface where most accidents at events happen.
7. What battery-powered illuminated furniture solves
Illuminated furniture is a strong element in a lighting plan because it merges two items - the furniture and the light source - and does so without a cable. Our range has 45 battery-powered pieces and 23 ready-made sets - cocktail tables, dining tables, chairs, armchairs, sofas, bar counters, stools and the 195 cm relax lounger. The body is polyethylene, IP54 rated, the colour switches by remote control between seven shades, and one charge gives 6-8 hours of light according to the manufacturer, depending on the colour. In lighting-plan terms this covers the mood layer and partly the accent layer, at exactly the height that is hardest to work at: table and seat height, in the middle of the space, where there is nothing to hang a lamp from. A ready-made set is doubly useful for hire, because it furnishes a zone in one step; the set price is 95 per cent of the members' list prices, and the daily hire rate is 20 per cent of the gross price. Concretely: a 150 cm illuminated bar counter with lower storage is HUF 290,000 incl. VAT, so HUF 58,000 a day; the lounge corner set with a modular sofa is HUF 665,000 incl. VAT, so HUF 133,000 a day; and a chill set of four cube stools is HUF 237,500 incl. VAT, so HUF 47,500 a day. For several days and larger configurations an itemised quotation is issued.
8. What needs a LED wall
A lighting plan and an image plan are not the same thing, and it is worth separating them. Illuminated furniture gives even, single-colour light and has no image surface: lettering, a logo, a programme, a live camera feed or moving visuals cannot be shown on it. As soon as any of those is needed - a welcome board at the entrance, a programme view in the corridor, brand content on the stand, a stage backdrop at a concert - the answer there is an image surface, that is, a LED wall. With us that is built from 64 × 192 cm portrait LED poster panels, linked from one to five panels; there is a list price for the indoor P2 version, HUF 30,000 + VAT per panel per day, while the other versions are quoted individually, because their purchase prices differ. This does need mains power, though, so for the purposes of the cable plan it has to be written back into step six.
The plan sheet you can hand over
The finished lighting plan is a single page with five columns. The first column is the name of the zone, as you marked it out in step two. The second is which layer you are bringing there: general, mood, accent, or a combination of these. The third is the specific equipment and the quantity. The fourth is time: when it switches on, when it changes, when it goes off, and who touches it. The fifth is power: mains, generator or battery - and in the last case with a note on when it has to be charged. If these five columns can be filled in for every row, the plan is finished and can be handed to the venue, the technician and the photographer alike. If any cell is left empty, that is where the plan is weak, and that is exactly what will come to light on the day. If you do not know what should go in the third column for your own event, tell us the size of the venue, the number of guests and the nature of the occasion, and we will put the list of pieces together for you.
A few questions and you get the recommended pixel pitch, the size and an indicative price.
Start the configurator →


